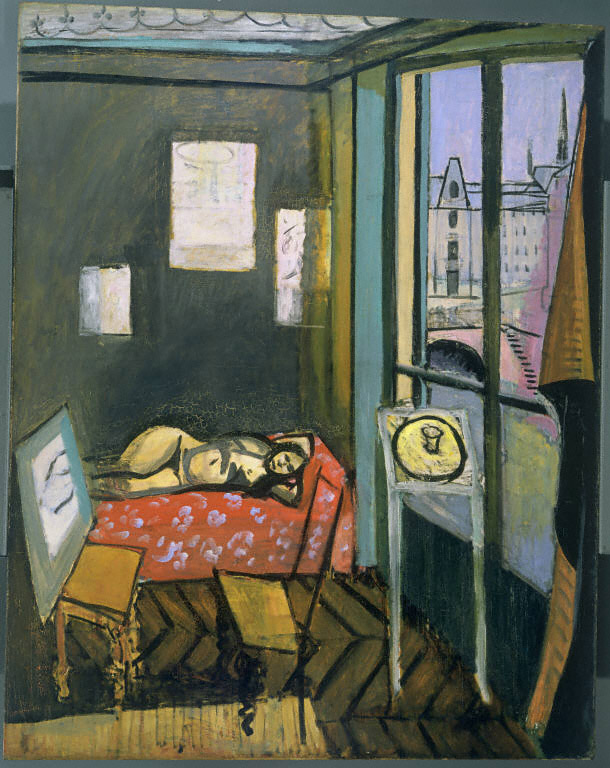
Henri Matisse, Studio, Quai Saint-Michel, 1916. Oil on canvas, 58 1/4 x 46 in. The Phillips Collection, Washington, D.C. Acquired 1940
Weekday Spotlight Talks at the Phillips are an ideal way to spend some quality time with a particular work in the permanent collection and can often lead to new insights into composition, materials, and the artist’s intentions. Last month, our Teacher Programs Coordinator Meagan Estep led a small group of visitors in discussion about Henri Matisse’s Studio, Quai Saint-Michel (1916), currently on view on the second floor of the Goh Annex.
Meagan began by asking about the group’s initial impressions of the painting. Visitors were largely struck by Matisse’s use of two-dimensional shapes (particularly the flattened table) alongside three-dimensional shapes (such as the two chairs that show perspective in the room). Aside from these technical aspects of his composition, visitors also remarked on the absence of the artist in the scene. A nude model reclines on a sofa and a canvas sits upon one chair, yet the chair directly across from the canvas (where the artist would sit) is conspicuously empty. The consensus among the group was that Matisse’s composition not only depicts a reclining nude but also documents his workspace and artistic process as it is unfolding.
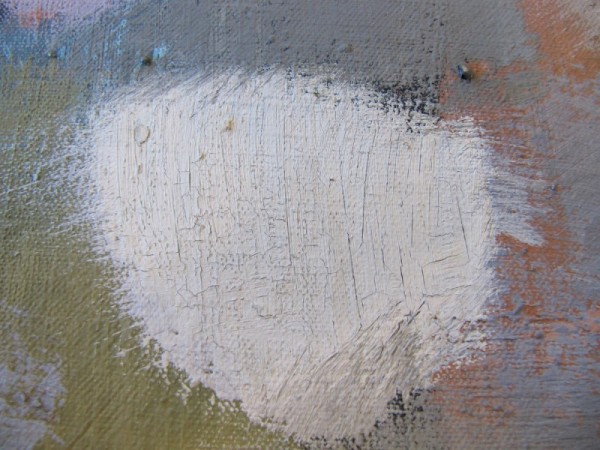
Upon close inspection, the group also noticed an area of cracked paint just above the reclining nude. This subtle detail is visible in person but wouldn’t necessarily be apparent in a reproduction of the work online or in print (just another example of the new discoveries that are possible when visiting artworks in person). Meagan revealed that the Phillips conservators have studied this cracked area closely and discovered that Matisse reworked this area with additional layers of paint. The cracking occurred because one of the earlier layers did not dry completely before the artist painted over it with a faster drying paint. The cracks mirror the curves of the woman’s figure, suggesting she was originally placed slightly higher in the composition. It is thought that Matisse’s lack of effort to disguise this and other changes was intentional, to allow the evolution of the composition to be part of the experience of the work. Therefore, the conservators have left it as (perhaps) Matisse intended.
Elizabeth Kachavos, Marketing Intern