Did you know your iPhone is capable of taking professional quality photos? Here are some settings and techniques that will instantly improve your iPhone photos. We hope you’ll put your photo skills to the test with our upcoming July 1-31 Frank Stewart-inspired Photo-a-Day challenge. Follow @phillipscollection and share your results with us using #PhillipsPhotoChallenge!
iPHONE SETTINGS
Turn on the Grid
Grid lines are key for photo composition. They help you level the horizon, center the subject, and balance your photos.
Mirror Front Camera for Better Selfies
While you’re in settings, switch on “Mirror Front Camera” so your selfies will turn out how they appear when you press the shutter (and aren’t flipped).
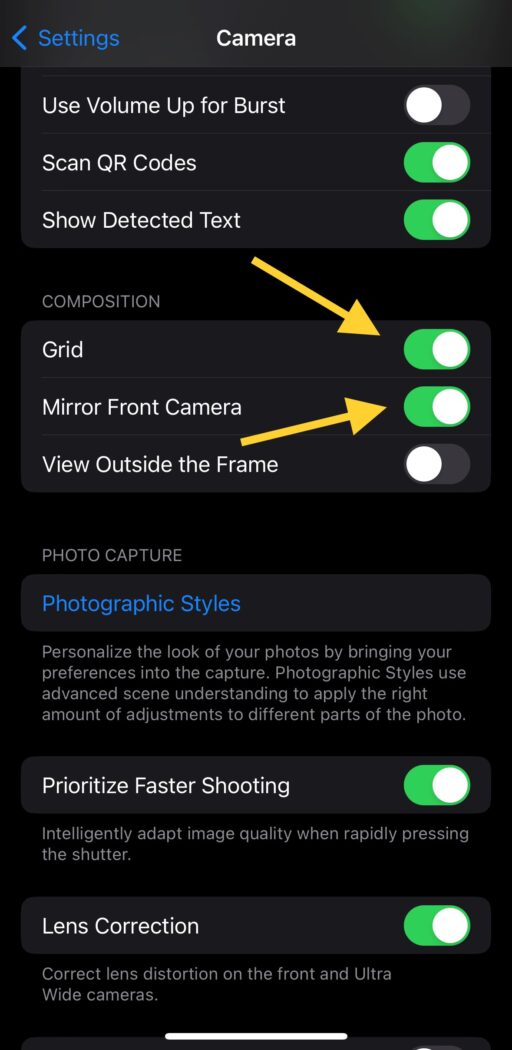
Turn on “Grid” and “Mirror Front Camera” in your camera settings
Set the Focus
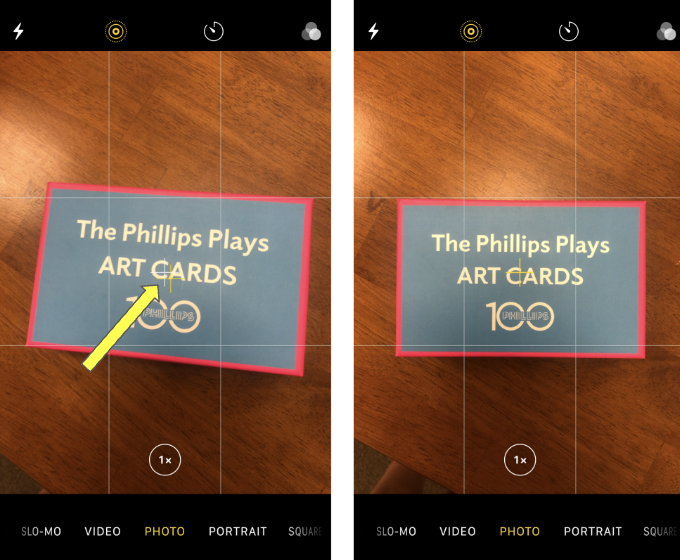
Look for interesting colors, textures, and patterns in your subject and shoot them up close. To set the focus on your subject, simply frame your shot, then tap the screen where you want the camera to focus. A yellow box will appear to indicate the focus area.
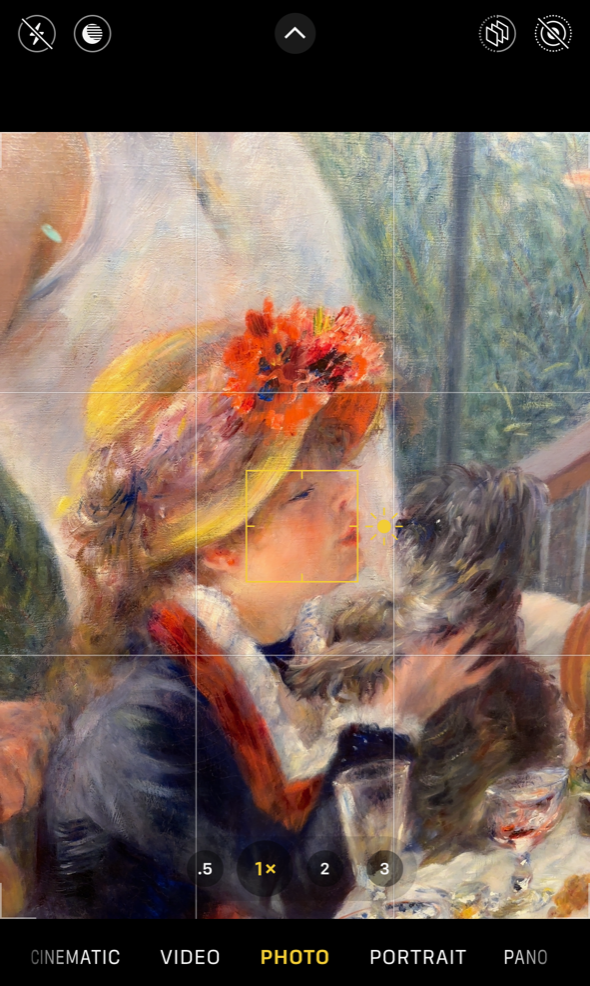
Use the yellow square to help focus your image
Adjust the Exposure
After you tap the screen to set the focus, you’ll see a yellow box and a sun. Hold your finger on the sun and drag up for more light to make your image brighter. Drag the sun down for less light to make your photograph darker.
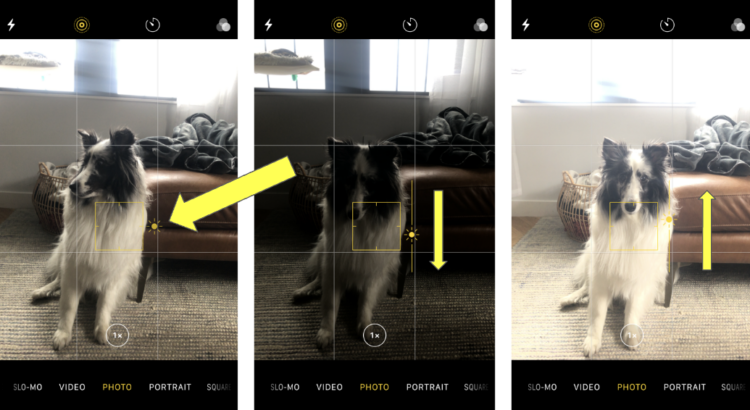
Slide the sun icon up and down to change the exposure
Get Closer Instead of Zooming In
Zooming in degrades the quality of your photograph. If you want more of the subject in the photo, take a few steps closer. Or take the full scene and then crop your image later.
Use the Leveling Tool (+) for Overhead Shots
Trying to take a photo of your picturesque meal? Go for a bird’s eye view with an overhead shot. When you hold your phone above your subject, two plus signs (one yellow, one white) will appear on your screen. When the two + line up and turn into one yellow +, your camera is level.
Use the leveling tool to straighten your shot
Use Portrait Mode for Portraits
Portrait mode has features to add depth to your photos. You can add more focus to your subject by blurring the background. To use Portrait Mode, open your camera and swipe over to “Portrait.” Tip: make sure you’re standing far enough away from the subject (the screen will tell you) and tap the screen where you want it to focus.
The f-stop decides how much the background is blurred in a Portrait Mode shot. To do this, go to Camera > Portrait Mode > “f” in the top right corner of your screen. From there you can slide left and right to find the right amount of blur you want. Tip: You can also change this after you take the photo!
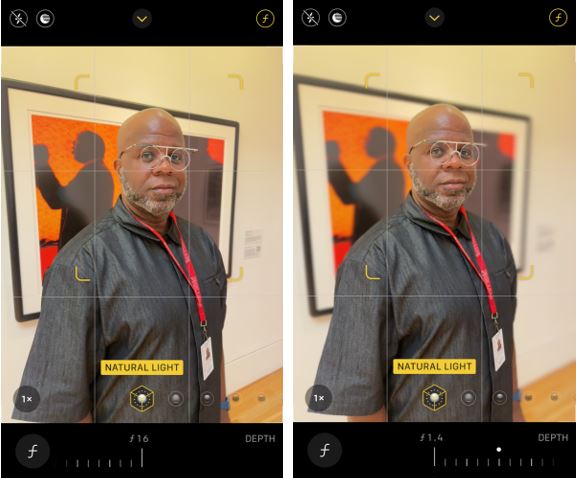
In Portrait Mode, f-stop turned all the way up on the left has a sharp background, compared to the blurry background in the right where f-stop is turned all the way down
Use the Timer Mode for Steady Shots
Sometimes using your thumb to tap the shutter button can make the camera shake at just the moment you’re taking the picture. In addition to using the timer mode for a no-hands selfie, you can use it for any shot to keep both hands on the phone when the shutter opens. Check the top of your camera screen for the timer icon!
0.5x vs 1.0x vs 2x
To use the widest lens, tap 0.5 (at the bottom of your photo screen). Tap 1.0x if you want to capture a scene that has a moderately wide field of view. And if your phone has it, 2x is your telephoto lens.
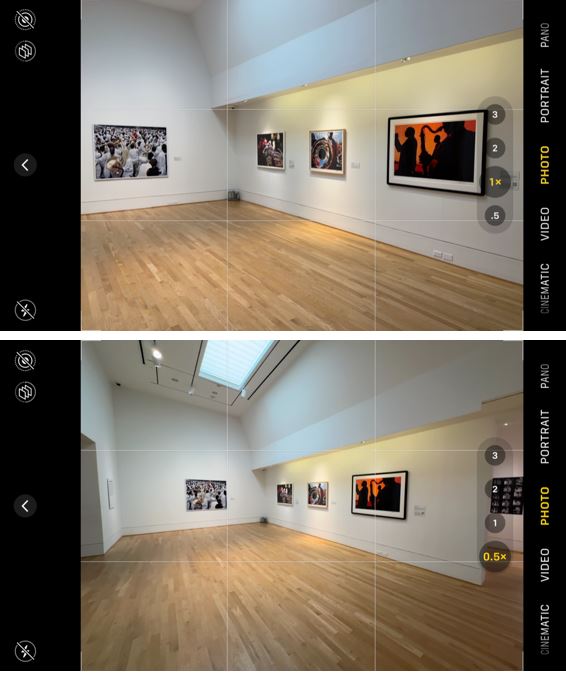
The 1x lens on the top shows a tighter crop than the 0.5x lens on the bottom
COMPOSITION TIPS
Shift Your Perspective
Try taking photos from outside your regular standing or sitting position. You can shoot your subject from up high or down low. Taking a photo from a slightly higher position is flattering for your subjects. Shooting from a lower angle is great for a few reasons: It makes your photo look intriguing by showing a unusual perspective. If you’re outside, it also shows your subject with nothing but sky in the background, which makes your subject stand out. It can also show interesting details in the foreground.

Try a low angle to capture foreground details
Create Depth
Use leading lines in your composition like roads, paths, railway tracks, rivers, and fences. At the beach, you can use the water’s edge or ripples in the sand. Compose your photo so the lines lead from the foreground into the distance. This draws the viewer into the scene.

Use leading lines in your composition to create depth
AFTER THE PHOTO
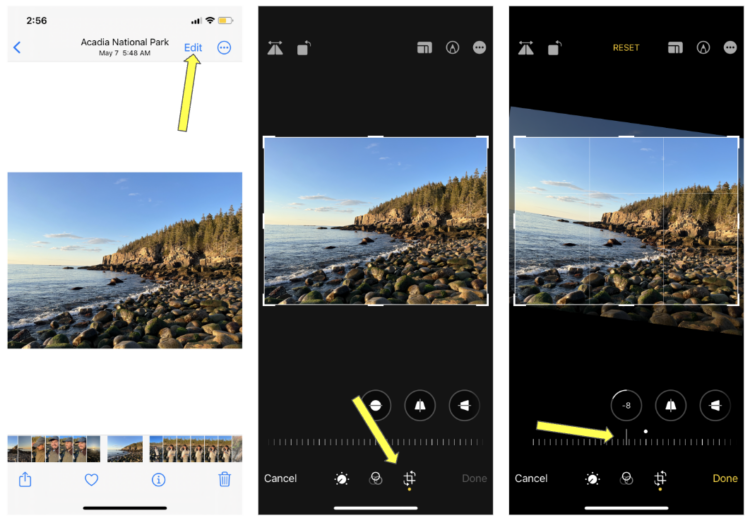
Editing your Photo
In addition to editing apps than can help clean up your photos and adjust the lighting, you can do plenty with the tools already on your phone. From the photo, click “Edit” in the top right corner and you’ll see a menu in the bottom. Play around with the magic wand and other features to get comfortable with what editing options you have. Below the photo you’ll see options like “Studio Light,” “Contour Light,” “Stage Light,” and more that will add professional studio light effects and make any photo look professional quality!
Straighten the Horizon
A straight horizon is key to a good composition. If you don’t quite get it as straight as you want it in the moment, you can open your photo and click edit. Then select the crop tool at the bottom and the first option is “straighten.” Slide your finger left and right to rotate the image just how you want.